
SAFARI TRIP PREPARATIONS
PHOTOGRAPHY
The first question was, of course – “This is going to be the trip of a lifetime. What do we need for photography to capture the experience?”
We are not National Geographic pros, and this is the extent of my online postings (and offline publishing, except for a few personal photo books.) Nobody sponsors us or lends us fancy equipment. So, we had to get our own stuff, just like real people.
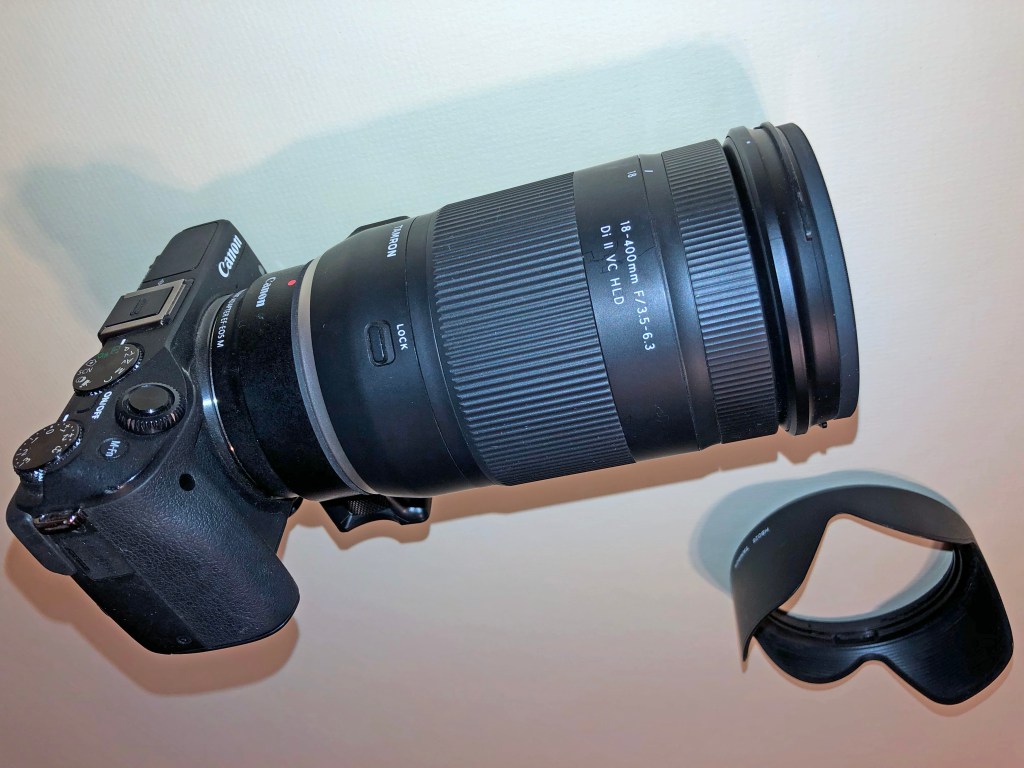
I have a Canon EOS M3, a tiny little mirrorless camera with interchangeable lenses. I even have the 55-200mm telephoto zoom for it. It does 24Mp (megapixels) so you’d think that would be good as far as picture size, and it was fully controllable from automatic mode to full manual mode.
Fortunately, a lot of others have published notes and picture essays like these here, so we had something to start with. Most said (logically) that you need a good zoom, something about 600mm seemed to be mentioned most often. By comparison, 200mm was nowhere near good enough since often the wildlife would be some distance away. I went to a local camera store (Henry’s) to look at an advertised 600mm telephoto zoom that was on sale. Sorry, that thing was a beast. At least a foot long, four inches diameter and quite a few pounds. The salesman suggested the Tamron 18-400mm superzoom. This seems adequate and not really a budget buster. (Of course, that’s a relative term…) There are no such lenses (yet) for Canon’s EF-M mirrorless mounts, so this is an EF-S that fits their Rebel smaller sensor (APS-C) SLR’s. Fortunately, I had bought the EF-S to EF-M adaptor from B&H when I was in New York.
How did it work? Great. Or rather, GREAT! Mind you, these sorts of lenses I can find for example, evidence of purple fringing at extreme zoom. But see if you can find this in any of the pictures… not very often. And the advantage of 18mm short end means that when I need closer photos, I could use it instead of changing lenses all the time. The Serengeti trip is very dusty at times – you do NOT want to be changing lenses. The only downside is that even this more manageable lens dwarfs the camera body. 400mm with an APS-C sensor (and the ability to crop as needed) was more than enough for most situations.
For a backup, we got a Canon SX730HS which has a 40x zoom, 20.3Mp; the 40x optical zoom, combined with a digital zoom, meant it far exceeded the recommended 600mm equivalent. (Cameras typically discuss their lenses are “35mm equivalent” since different lenses on different size camera sensors give different results) After all, it would not be fun if something broke and we could not take any pictures. In the end, this worked out great, because Kellie got to use that camera and in fact, many of our best pictures came from that camera! the only downside here, is that a really long zoom needs a really stable base… and sometimes aiming is difficult.

The flip-up screen was convenient and we didn’t find it drowned out by the sun. The digital zoom (beyond 40x) was not that useful, often the picture was too pixelated or fuzzy. At extreme zoom, sometime either camera had difficulty with autofocus.
Which camera took which photos? Right click on a photo and look at properties. The photo name will be something like IMG_0420 or IMG_8123. If the number is low (below 2000) it’s from our (new) superzoom Canon PowerShot. Pictures in the 7000 and 8000 range are from the Canon M3. It’s interesting that it’s hard to tell.
Plus, for this blog, I have cropped, processed, then resized any pictures I used. A 4000×6000 24Mp can be 12Mb and is overkill for this blog. Some M3 photos were even take as RAW and then processed back home to produce JPGs. Then photos are all generally shrunk down to about 1200 or 1600 pixels across before uploading because space is limited on WordPress. We took 29GB, over 3,000 photos; these are just some of the best. Digits are free – just keep clicking away. On my 128GB card, the “pictures remaining” counter never went below 9999. (Hint – use Fotosizer to resize a number of pictures to the same size at once.)
(Camera hint I assume everyone knows – never overwrite your original photos – if you must edit, save the fixed pictures separately. Each edit loses detail.)
So that left the question of stability. A tripod was out of the question in a Land Cruiser; a monopod would be almost as difficult and a pain to pack. Since we would need to balance the camera on a door or roof (or as it turns out, a railing around the roof opening) some form of soft camera rest was needed.
Some articles online mentioned bean-bags as a form of stability- take a bag with you, buy dried beans locally as the filler, then dispose of them before flying home. Then we found these online at thepod.ca Both are 5 inches diameter and lightly filled with plastic beads so they are pliable. The Red Pod, on the left, has a tripod mount screw in the center for smaller cameras. The Green Pod on the right has the tripod screw on the edge for fancier cameras with bigger longer lenses. In fact, the Canon EF-S adapter has a tripod mount too, to balance big lenses better. That meant I could leave my shoulder strap attached to the M3 body tripod socket (You don’t want to drop an expensive camera overboard near wild animals!) and attach the Pod with the mount’s tripod socket.
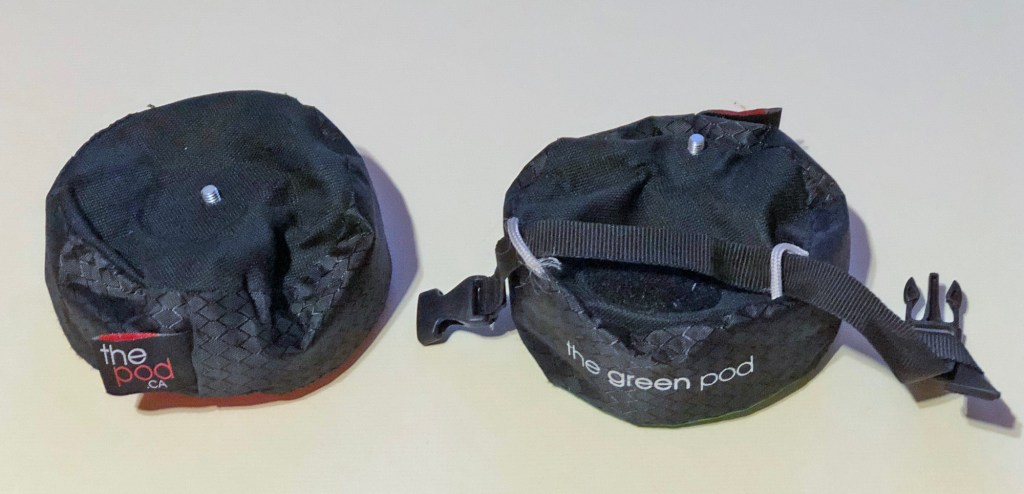
The Green Pod also has a strap to go around the lens. This was the only minor drawback; I had to leave that strap fairly loose, since if too tight I could not adjust the manual zoom on the lens. Stand up, plunk these bags down on the railing and you have the perfect stable platform to take long-range telephoto pictures. They were light and solid so you could lift the cameras and carry them around with the pods always attached. They weren’t in the way for handheld camera work.
And we do need to mention our waterproof Panasonic Lumix DMC-TS3. It is responsible for the Sharm el Sheik fish pictures on our Egyptian trips, but did not have the zoom for wildlife photos – but we took it for the snorkelling we expected to do (and did) off Zanzibar.
OTHER ELECTRONICS
We brought the usual assortment of cables – each of the cameras came with battery chargers. I also brought a 3-way outlet to plug in multiple (North American) devices, and a British adapter for the Tanzanian power sockets. Most hotels have the multi-way plugs that accommodate British, European, Chinese and North American plugs; but a few places (most notably the Osupuko tent camp) had only British power sockets. I also brought a spare battery for the big camera.
Also must point out – Osupuko ran the power for a short time during the evening, until their batteries run down; then started the generator at 6AM. So don`t wait to start charging things! Tarangire, see the photo on that page, the Lodge had NO power in the tents, so charge what you needed at the bar before going to your tent. Plan ahead!! Accommodations are very nice and very comfy, but this isn`t the Holiday Inn; however it just meant we appreciated the Serena Ngorngoro when we arrived there…
We of course brought noise-cancelling headphones for the flight. Hint, figure out how to pair them with your device before the flight. I brought a cheap android tablet, since I`d just gotten my iPhone 8+ the month before and decided I did not want to risk it on this trip (but then, I took it anyway). So we also brought chargers for the iPhones and a small 12000mAh USB powerbank to charge phones away from power. Wifi was available at Dashir, and also at Tarangire and Serena Ngorngoro, and where we stayed in Zanzibar – but reception could be spotty at times. Unsurprisingly, there was no internet in the camp in the middle of the Serengeti. Unfortunately, Rogers did not have a “Roam Like Home” option with Tanzania so we avoided using cellular and simply used WiFi whenever possible.
Fun story – I put my phone in the tray in the Land Cruiser. Suddenly at one point it started emitting an emergency alarm. There was another phone on top of it, and on a particularly bumpy section of Serengeti road that must have pushed the home button 5 times in rapid succession, which is what triggers a 911 emergency call. Fortunately the alert was to tell us that it could not find a cell signal, so we did not actually call the police.
MEDICAL
We also got the necessary recommended vaccinations for the trip.
Tetanus – good for 10 years – had this in 2012 before going to Egypt.
Twinrix – for Hepatitus A and B – also good for 10 years, possibly for life – also had this shot (3 shots) in 2012.
we took Vivotef for Typhoid before going to India in early 2017, it is good for 3 years.
We took Dukoral for Cholera in early 2017 also – it’s good for 2 years, with the recommended booster (Single dose) we took before this trip.
We took anti-malaria pills (Malarone), which start before the trip and continue a few days after – even though we actually saw no mosquitos. We brought insect repellent, but the only place we needed and should have used it was Tarangire, and then for tsetse flies not mosquitos. The Tsetse flies look like ordinary houseflies but have a painful bite that can make you bleed and itch like a northern Canadian horsefly.
There are a few others recommended, but generally are not necessary. I did read something (not sure how true) that because there’s an area of Zambia where yellow fever occurs, if you visit Zambia (i.e. Victoria Falls) then you need a Yellow Fever vaccination. This did not apply to us.
